Preface
Turn 0, the turn before the game actually starts where I have personally lost more games then most of you will ever play. The half assed ideas and winging it of a vibe coder playing drunk hammer doesn’t always set you up for success oddly enough.
The “Turn 0” concept is not new or ground breaking. It’s a fundamental aspect of strategy gaming and a massive opportunity for skill growth.
What is turn 0? Everything that happens before the game actually starts. The time before the 1st turn but after you see the table and the lists. Placing objectives, reading the table, choosing board edge, deployment, and even scouting. Understanding how to dominate these elements of the game will be a critical tool in moving your game play to the next level.
Let me break down how I think about these topics and then how I combine them.
Exchange of lists:
First we need to understand the various styles and archetypes of lists that exist. I wont deep dive here however we have a helpful list of common kings of war terms linked here with army styles described briefly!
https://honest4s.com/posts/kings-terminology/
Learning to identify most of these is easy and I’m not gonna lie, just ask your opponent if you’re not sure they will almost always tell you. “Hey im not sure what to make of this, is your army really just a pile of fast hammers?”. It helps especially if you’re newer to talk things out for 30 seconds. DON’T BE CAUGHT OFF GUARD BECAUSE YOU DIDN’T KNOW A THING COULD FLY! READ THE LIST AND ASK CLARIFYING QUESTIONS!
Then I need to understand how my list and style plays into each of these and what they do well and bad vs me. The best way to do that is by playing the game a lot of times. Once I understand the match up I can take that knowledge to the map and mission combination. I usually think about this as a triad of key points that tell me what I need to do- the list pairing, the map, and the mission. More articles will drop in time really deep diving into list match ups but basically you’re either the aggressor or the defender.
Reading the Map:
Understanding the table in functional zones at a glance. Those zones being
- Attackable
- Defendable
- Firing lane
Those lead into me seeking either the
- Pressure amplifier side
- Pressure mitigator side
Attackable-
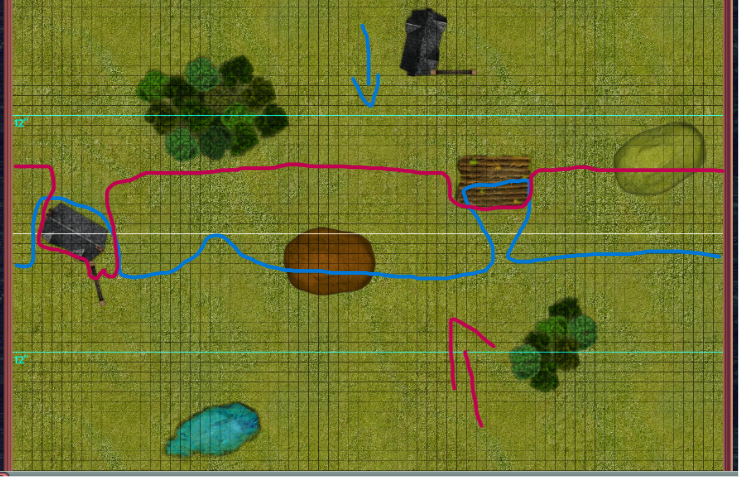 All I’m thinking about when picking a board edge and understanding the basic flow of the map for attacking is how fast can a unit get somewhere on turn one. In the picture above we have a pretty balanced map. From JUST the attacking view point neither side is at a unique advantage over the other. Clean unhindered line to press forward and force fights almost entirely unhindered.
The few pieces of terrain in the way either are small enough to work around (like the woods on the lower right) or block both sides equally (the house on the middle left). I’m not upset about getting either side if my plan is to be the aggressor and force melee fights.
Defendable-
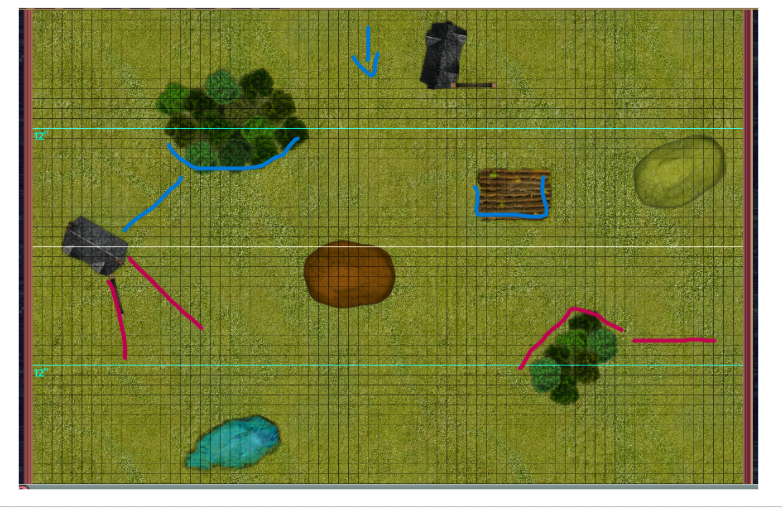 So here on the same map I’m looking for the exact opposite opportunities. I’m looking for choke points and terrain I can defend at an advantage. Typically I am only looking outside deployment zones but some missions don’t need to. On this map for example the house inside the blue deployment would be AWESOME if i had indirect artillery to stick behind that wall.
So to help expand upon what I see here, from the blue side we have a choke point between the house and the woods (Remember you can’t route a house). We have the woods itself creating an area we can lip back from and force a hindered charge. And we have the field allowing for some creative chaff play with hindered charges to set up some neat counter attacks.
From the red side we have the house on the left giving us 2 options. The 1st is the wall, we could post up behind it and be a shooting threat with cover and hinder. Or 2 we can press forward and use the house as our anchor on the flank making us hard to charge and almost impossible to envelop. The woods on the right give us a similar option to the blue side. Defensible terrain and a choke point using the board edge as impassable to section off that side as well. If I have artillery they can deploy inside the pond for similar results to the blue side.
Now from a purely defence side, the mission will matter of course but so does my army type. If im playing a slow durable army im going to want to use that limited speed early to buy space before i get stuck in the grind. The blue side has not much more, but a little more room to move up and still be defensible. So I would be aiming for that. The red side by contrast has better shooting positions to post up early and hold.
Again on this balanced map neither side screams the best choice. But experience says if one side is better you get the worst one anyways.
Firing lanes-
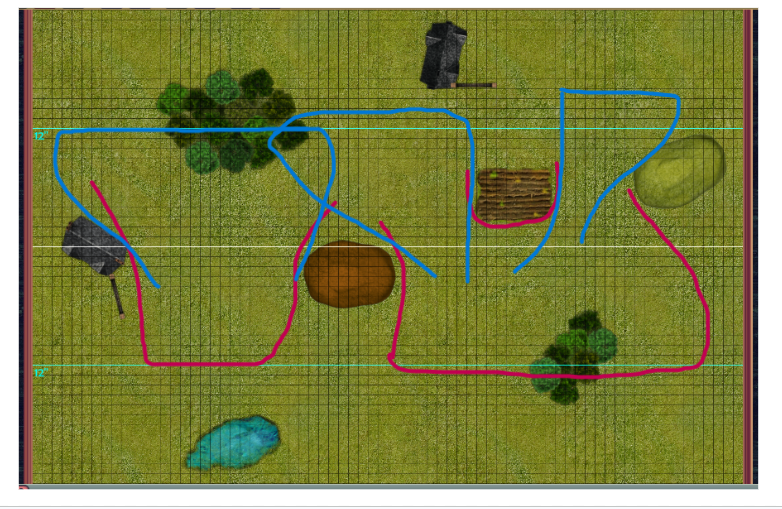 The most chaotic map to see and the easiest to identify on the table. Put bluntly. Can I shoot from there to there without cover OR where can they shoot me without cover?
A few things to keep in mind. If the woods can have a unit deployed with the center point in them they don’t block LOS or apply cover. The hill on the top right might be worth walking onto and shooting turn one and then you have the rest of the game to shoot across the board at your leisure. Not every army cares and not every match up needs this knowledge but you learn quickly if your vs 4 cannons and a pile of long guns not to recreate pickets charge and hope for the best.
On this map again both sides have a really balanced opportunity to fire. Blue is more chopped up with less long clear sweeps so in my head if im going to GET shot at im seeking the red side. If they want the hill I save a round. If they move into the field I can close to combat 1 turn faster. And on the whole I will have more opportunities for cover as I advance. So conversely I think the red map leans in favor of a gun line but the mission might sway your opinion.
Putting it all together:
Pressure amplifiers and mitigators-
Now we start putting it all together! When I compare my list style to my opponents I need to identify where I’m going to be the aggressor. I then want to read the map and play styles on the lists. Should I seek cover, should I seek to force unhindered fights, should I press the tempo up, or slow it down.
When I put everything together I run into one of 2 schools of thought.
If I want to be the aggressor, I am looking to combine the board state, how I deploy, and where I can maximize my unit strengths. I want to apply pressure from deployment to manipulate the battle and force the game regardless of the other players actions. You will also hear players call this “asking the questions” play style. Things like clear lines of fire and movement, minimal terrain interaction past turn 1, a wide open flank opportunity, an easy to hold objective with a chaff piece I can buy for free while my army runs off to roll dice.
If I am NOT going to be the aggressor, I can’t do that. I need to look at ways to use the board to mitigate the pressure my opponent should be applying. I am seeking out those terrain anchors that can buy me time, I’m looking for areas I can force dances around a hill for LoS, and I’m looking to not necessarily maximize my army play style but rather hamper yours MORE then my own. If you’re not the one asking questions you will be the one answering them.
In conclusion:
Once you get to the point where you can see the game and predict what moves players are most likely to take, you’ll be at a skill level where this turn 0 stuff will start to click. I think about this in a way not conventionally held by a lot of my friends and talented players in the scene so dont assume this is the end all solution to winning the game on deployment! I chose a balanced map to show on so I could use the same map for all 3 pictures. Go on UB or make one on the table and try to make the 3 map drawings yourself. Real fast you’ll discover if you get and like how i think about this or not. I’d say it’s about 50/50 from the people I’ve taught and talked to at a high level in this community.
Once you figure out turns 1-7, adding turn 0 to your skills changes the game. And remember to practice games on the WRONG SIDE! If one side is so good it’s crazy, pick the other one! You have to be comfortable being on the back foot. You will lose that dice roll so if the game is just for practice or a pickup game.. Sometimes taking the harder side can be a really interesting challenge for the evening.
As always I hope you find time to table your foes and roll away your woes.
Thanks for reading and I hope to play you soon,
Cyle DinoLord Pool